For developing applications in JAVA, most developers typically use an Integrated Development Environment to leverage built-in features to improve productivity. The most popular JAVA IDEs are NetBeans, Eclipse, Android Studio and IntelliJ IDEA.
Researching over internet, I was quite impressed with the features provided by RedGate’s IntelliJ IDEA – hence I downloaded it and wanted to quickly spin up a Hello World application.

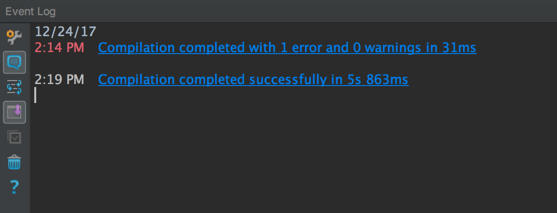
However while building the project, I bumped into an unexpected error —

Error:Cannot run program “/Applications/IntelliJ IDEA.app/Contents/jdk/Contents/Home/bin/java” (in directory “/Users/samir/Library/Caches/IntelliJIdea2017.3/compile-server”): error=2, No such file or directory
Being new to the IDE, it took me some time to figure out the root cause of this error. Even though the fix was simple, I wanted to document this so that others bumping into the same error can quickly proceed, without getting stuck.
While working in IntelliJ, you can access the IDE log files to view additional details on the error — Help Menu -> Show Log in Finder
java.util.concurrent.ExecutionException: com.intellij.execution.process.ProcessNotCreatedException: Cannot run program “/Applications/IntelliJ IDEA.app/Contents/jdk/Contents/Home/bin/java” (in directory “/Users/samir/Library/Caches/IntelliJIdea2017.3/compile-server”): error=2, No such file or directory
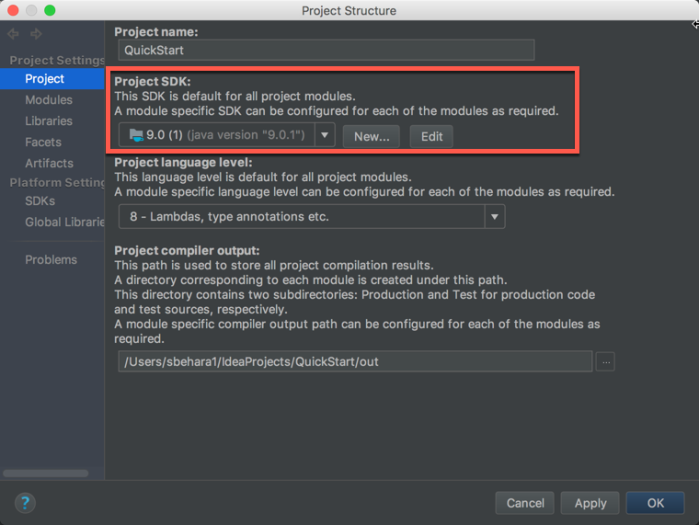
Looking at my Project Settings, I figured out that I need to specify the SDK I want to use in my project.

Next I checked the SDK version installed in my new laptop and figured out there was not any! I went ahead and installed the JDK 9 on my Mac from here —
http://www.oracle.com/technetwork/java/javase/downloads/index.html

After I installed the SDK, I navigated to the Project Settings and selected the new JDK configuration from the installation location in my local.
I then attempted to build the project and it ran successfully. YAY!!
Summing up this article, in case you see this specific build error —
Navigate to the File Menu and go to Project Structure. Under the Project SDK section, make sure to add the new SDK you have installed in the system.
When you are creating a new project, you can also set the Project SDK at that point –

It would have been nice if IntelliJ IDEA installation also included a default SDK so that developers can get started right from the word go. I did not want to miss out on this opportunity & went ahead and suggested the same to the IntelliJ Team –
https://youtrack.jetbrains.com/issue/IDEA-184243
Incase you bump into issues with IntelliJ, you can report them to JetBrains Team here —
https://youtrack.jetbrains.com/issues/IDEA
Start a 10-day FREE trial at Pluralsight – Over 5,000 courses available
![]()
Categories: Java
 Tomcat Error – java.net.BindException: Address already in use
  Monitoring your Spring Boot applications using Actuator
  Resolving Gradle issues in IntelliJ IDEA
  Synchronize Gradle projects with workspace failed
great, thanks!
LikeLiked by 1 person
i did not test it but Thx
LikeLiked by 1 person
This works also if you Switch your JDK Version while having already one set up in your Project. Much Thanks!
LikeLiked by 1 person
Thanks a lot.
LikeLiked by 1 person
Thank you for sharing that experience. Appreciated!
LikeLiked by 1 person
Thanks everyone for your comments. I am glad that you found the blog useful.
LikeLike
Thanks for details, very useful blog for java beginner
LikeLiked by 1 person
My Isuue is not resolved yet after changing the JDK
LikeLike
thanks!
LikeLiked by 1 person
Perfect solution!
LikeLiked by 1 person
Thank you!
LikeLike