Kubernetes is an open source container-orchestration system for automating deployments, scaling and management of containerized applications. In this tutorial, you will learn how to get started with Microservices on Kubernetes. I will cover the below topics in details —
- How does Kubernetes help to build scalable Microservices?
- Overview of Kubernetes Architecture
- Create a Local Development Environment for Kubernetes using Minikube
- Create a Kubernetes Cluster and deploy your Microservices on Kubernetes
- Automate your Kubernetes Environment Setup
- CI/CD Pipeline for deploying containerized application to Kubernetes

Immutable Infrastructure
Containers and Kubernetes has made it possible to run pre-built and configured components as part of every release. Users do not make any manual configuration changes. With every deployment, a new container is deployed.
Self Healing Systems
Kubernetes ensures that the Desired state and Actual state are always in sync. Kubernetes continuously monitors the health of the cluster and ensures that the system is self healing. This is a huge benefit in case of application failures and increases the reliability of the system.
Declarative Configuration
We provide the apiserver with the manifest files (yaml or json) describing how we want the Kubernetes cluster to look. This form the basis of the cluster desired state.
Horizontal Autoscaling
One of the cool feature of Kubernetes is that it can monitor your workload and scale it up or down based on the CPU utilization or Memory consumption. This automatic scaling is great for applications having spikes in load and usage for a period of time. You have the option for —
- Vertical Scaling — Increasing the amount of CPU the pods can use
- Horizontal Scaling — Increasing the number of pods
Kubernetes Architecture
Let us now discuss about the Kubernetes architecture and look at the various components of the Master and Worker Nodes.

At a high level, K8s Architecture has 2 main components — Master and Worker nodes.
The Master is the entry point and is responsible for managing the entire Kubernetes cluster. It takes care of scheduling, provisioning and exposing the API to the client.
You can communicate with the K8s master via the K8s CLI or via the API.
K8s objects are created/updated/deleted in a declarative manner by using configuration files which are submitted to the Master. Container Images for your application are stored in the registry – which can be either a Private Registry or DockerHub.
Master node has 4 components —
- API Server
- Scheduler
- Controller
- Etcd

API Server
Front end of the K8s control plane that exposes the K8s API and consumes the Manifest file provided by the user. It is the gatekeeper for the entire cluster and all the administrative tasks are performed by the API Server.
All the user requests needs to pass through this. After the requests are processed, the cluster state is stored in the distributed key-value store.
Scheduler
Schedules the work to different worker nodes based on the cluster resource usage and constraints mentioned in the application manifest file by the user. For example – There might be scenarios where the user wants the work to be scheduled on pods having a specific label.
Controller
Responsible for maintaining the state of the K8s cluster all the time. It tracks the current state of the objects, watches for changes and ensures that the current state is equivalent to the desired state.
Etcd
Distributed Key value store to store the current state of the K8s cluster, along with the configuration details. It is treated as the single source of truth of the K8s cluster.
Worker Nodes does all the heavy lifting work. It runs the applications using Pods and is controlled by the Master node. Users connect to the worker nodes to access the applications.
Worker Nodes have the following components —
- Kubelet
- Kube-Proxy
- Container Engine
- Pods

Kubelet
The main Kubernetes agent which runs on each node.
Responsible for communicating the health of the node to Kubernetes Master and Etcd.
It fetches the pod definition mentioned in the manifest file and instantiates the pods.
Manages the Pod and reports back to Master.
Kube-Proxy
Core networking component of Kubernetes. Communication is maintained seamlessly across all elements of the cluster. It is responsible for maintaining the network configuration and ensure that pod can talk with another pod, node can talk with another node, container can talk with another container.
Container Engine
Responsible for running the containers. Docker can also be treated like a container runtime.
Pods
Smallest deployable unit that can be created & managed in Kubernetes.
Pods are atomic and can also be defined as group of one or more containers that run in a shared context. It is important to note that each Pod gets a unique IP.
Containers inside the pods are able to communicate with each other and share the pod environment.
Creating a Local Development Environment for Kubernetes using Minikube
I have created a video tutorial showing how to setup a local development environment for K8s using Minikube. I will walk you through how to perform the required installations to create a running K8s cluster locally. We will then deploy an app using the K8s CLI. Once done, we will explore the deployed application and environments.
Minikube is a tool that allows you to run a single-node K8s cluster locally. Minikube starts a VM and runs the necessary K8s components. Once the K8s cluster is up, you can interact with it using the K8s CLI – kubectl.
Kubectl is used for running commands to deploy and manage components against your K8s instance. Minikube also configures kubectl for you.
Step 1 – We will do the required installations and create a running Kubernetes cluster.
Step 2 – We will deploy our app on Kubernetes using the K8s Command Line Interface.
Step 3 – We will explore the deployed application and environments
You can find below the scripts used in the demonstration —
This file contains hidden or bidirectional Unicode text that may be interpreted or compiled differently than what appears below. To review, open the file in an editor that reveals hidden Unicode characters.
Learn more about bidirectional Unicode characters
| // Install Minikube | |
| brew cask install minikube | |
| // Verify that minikube is properly installed | |
| minikube version | |
| // Install the Kubernetes Command Line Utility – kubectl | |
| brew install kubectl | |
| // Start Minikube | |
| minikube start | |
| // Check Minikube status | |
| minikube status | |
| // View Kubernetes Dashboard | |
| minikube dashboard | |
| // View Kubernetes Cluster Information | |
| kubectl cluster-info | |
| // View the nodes that can be used to host your applications | |
| kubectl get nodes | |
| // Create a new deployment | |
| kubectl run hello-minikube –image=k8s.gcr.io/echoserver:1.4 –port=8080 | |
| // List the deployments | |
| kubectl get deployments | |
| // Expose the deployment to an external IP | |
| kubectl expose deployment hello-minikube –type=NodePort | |
| // View the K8s services | |
| kubectl get services | |
| // View the URL that you can hit via browser | |
| minikube service hello-minikube –url | |
| // View the K8s pods in the cluster | |
| kubectl get pods | |
| // View the details of a specific resource | |
| kubectl describe svc hello-minikube | |
| // Delete the service and deployment | |
| kubectl delete service,deployment hello-minikube | |
| // Shut down the Minikube cluster | |
| minikube stop |
Automate your Kubernetes Environment Setup
I have created a set of scripts to install Minikube and Kubectl, so that you can run this script and have a functional development environment all setup for you to use.
This script is targeted towards developers using Mac and we will be using Homebrew – the package manager for macOS.
Homebrew is a free package manager for macOS and helps you to manage software in your Mac. You can install the software you need through command line in no time. There is no need to download DMG files and drag it to your applications folder. It makes the process of installing and uninstalling software so muck easier and faster.
The below script will install Homebrew, Minikube, Kubernetes Command Line Interface –
This file contains hidden or bidirectional Unicode text that may be interpreted or compiled differently than what appears below. To review, open the file in an editor that reveals hidden Unicode characters.
Learn more about bidirectional Unicode characters
| # Check for Homebrew and install if we don't have it | |
| if test ! $(which brew); then | |
| echo "Installing homebrew…" | |
| ruby -e "$(curl -fsSL https://raw.githubusercontent.com/Homebrew/install/master/install)" | |
| fi | |
| # Make sure we are using the latest Homebrew. | |
| brew update | |
| # Check for Minikube and install if we don't have it | |
| echo "Installing Minikube to run a single-node Kubernetes Cluster locally…" | |
| brew cask install minikube | |
| echo "Minikube Installation Complete" | |
| # Check for Kubernetes Command Line Utility and install if we don't have it | |
| echo "Installing kubectl to manage components in your Kubernetes cluster…" | |
| brew install kubectl | |
| echo "kubectl Installation Complete" |
CI/CD Pipeline to deploy Microservices in Kubernetes
In a Microservice ecosystem, Containers make it easy for you to build and deploy services. You can orchestrate the deployments of these containers using Kubernetes in Azure Container Service.
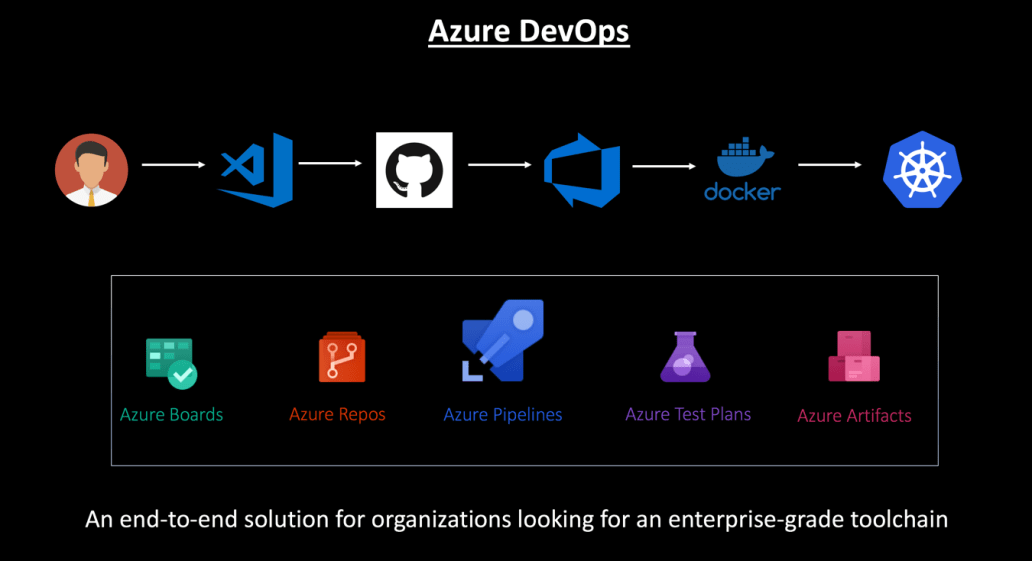
On 10th September, 2018, Microsoft released ‘Azure DevOps‘ using which you can setup a continuous build to produce your container images and reliably deploy to the managed Kubernetes.
Azure DevOps marks the evolution of Visual Studio Team Services. VSTS users will be upgraded into Azure DevOps projects automatically.
Azure Pipeline lets you continuously build, test and deploy to any platform (Linux, macOS, Windows) and cloud (Azure, AWS and Google). Azure Pipelines offers free CI/CD with unlimited minutes and 10 parallel jobs for every open source project. With cloud hosted Linux, macOS and Windows pools, Azure Pipelines is great for all types of projects.
- In the below CI/CD Pipeline leveraging Azure DevOps, a developer modifies the code and checks it in to GitHub.
- Using Azure DevOps, Continuous Integration triggers the application build, the container image is built and the unit tests are executed.
- Container Image is pushed to Azure Container Registry.
- Continuous Deployment triggers the application deployment into Managed Kubernetes – Azure Container Service.
Hope this tutorial was useful for getting started with Kubernetes in your Microservice journey. Incase you have any questions, please add a comment below and I would be happy to discuss.
Categories: Kubernetes, Microservices
 Monitoring Kubernetes in Production
  Istio 1.0 – The Production Ready Service Mesh
  Sidecar Design Pattern in your Microservices Ecosystem
  The Rise of Service Mesh Architecture
very nice Intro to the Kubernetes.
LikeLike